Recurring Calendar Events in Power Automate, using SOAP

It’s strange how using something called SOAP can make you feel dirty & unclean. But in the modern SharePoint development era, accessing your content via the new clean & shiny REST API can do just that.

I’m going to make the case that there is at least still one good reason to use the older SOAP web service, and that is: recurring calendar events.

šŸ‘» ooh, the dreaded classic interface šŸ‘»

In the age of the modern interface in SharePoint online, the new modern Calendar (which is now just a new view type on top of a custom list) lacks the ability to create or display recurring events. This lack of support for recurring events, while acknowledged by some as “nobody really uses those anymore”, really seems to stem from issues with how this feature was implemented in classic calendars in the first place. (As expressed by most of the other developers I’ve talked to about this.)

Even so, I’ve had to support solutions with the hard requirement of recurring events from several of my clients.

Ultimately, I say all of this because it does feel a little strange telling you how to call a SOAP web service from Power Automate. But here goes …

The Setup

At first glance, just using the Get Item(s) or Send an HTTP request to SharePoint actions would seem like the logical choice. But there are a couple of problems with trying to use these actions:

  1. The SharePoint actions generally expect the body content to be JSON, whereas calls to the SOAP web services expect XML.
  2. The default authentication token/cookie/whatever inherently passed to the SharePoint actions results in a 401/403 access denied error when using the SOAP endpoint as the destination.
  3. Get Item(s) doesn’t seem to allow us to select a classic calendar “Events” list.
Where’s my Events list?

So unfortunately, we can’t use these actions to get the calendar events directly and can’t use them to connect to the SOAP web services.

So, how do we do it?

This is where the (premium) HTTP action comes in.

Yep, this process is premium and there doesn’t appear to be a way around that. If you’re ok with that, let’s continue.

We’ll tackle the authentication hurdle first.

You can authenticate successfully to the SOAP endpoint by passing it the SPOIDCRL cookie.

There are 2 steps needed to obtain this cookie.

1) Authenticate to the Secure Token Service (STS) using an HTTP action to connect to the https://login.microsoftonline.com/rst2.srf endpoint, passing your username and password and the address of the site (URL).

1st HTTP request to Secure Token Service

The body of the STS request requires the following SOAP envelope, containing the credentials and the destination URL (address):

<?xml version="1.0" encoding="UTF-8"?>
<S:Envelope xmlns:S="http://www.w3.org/2003/05/soap-envelope" xmlns:wsse="http://docs.oasis-open.org/wss/2004/01/oasis-200401-wss-wssecurity-secext-1.0.xsd" xmlns:wsp="http://schemas.xmlsoap.org/ws/2004/09/policy" xmlns:wsu="http://docs.oasis-open.org/wss/2004/01/oasis-200401-wss-wssecurity-utility-1.0.xsd" xmlns:wsa="http://www.w3.org/2005/08/addressing" xmlns:wst="http://schemas.xmlsoap.org/ws/2005/02/trust">
  <S:Header>
    <wsa:Action S:mustUnderstand="1">http://schemas.xmlsoap.org/ws/2005/02/trust/RST/Issue</wsa:Action>
    <wsa:To S:mustUnderstand="1">https://login.microsoftonline.com/rst2.srf</wsa:To>
    <ps:AuthInfo xmlns:ps="http://schemas.microsoft.com/LiveID/SoapServices/v1" Id="PPAuthInfo">
      <ps:BinaryVersion>5</ps:BinaryVersion>
      <ps:HostingApp>Managed IDCRL</ps:HostingApp>
    </ps:AuthInfo>
    <wsse:Security>
        <wsse:UsernameToken wsu:Id="user">
            <wsse:Username>username</wsse:Username>
            <wsse:Password>password</wsse:Password>
        </wsse:UsernameToken>                
    </wsse:Security>
  </S:Header>
  <S:Body>
    <wst:RequestSecurityToken xmlns:wst="http://schemas.xmlsoap.org/ws/2005/02/trust" Id="RST0">
      <wst:RequestType>
        http://schemas.xmlsoap.org/ws/2005/02/trust/Issue
      </wst:RequestType>
      <wsp:AppliesTo>
        <wsa:EndpointReference>
          <wsa:Address>yourtenant.sharepoint.com</wsa:Address>
        </wsa:EndpointReference>
      </wsp:AppliesTo>
      <wsp:PolicyReference URI="MBI"></wsp:PolicyReference>
    </wst:RequestSecurityToken>
  </S:Body>
</S:Envelope>

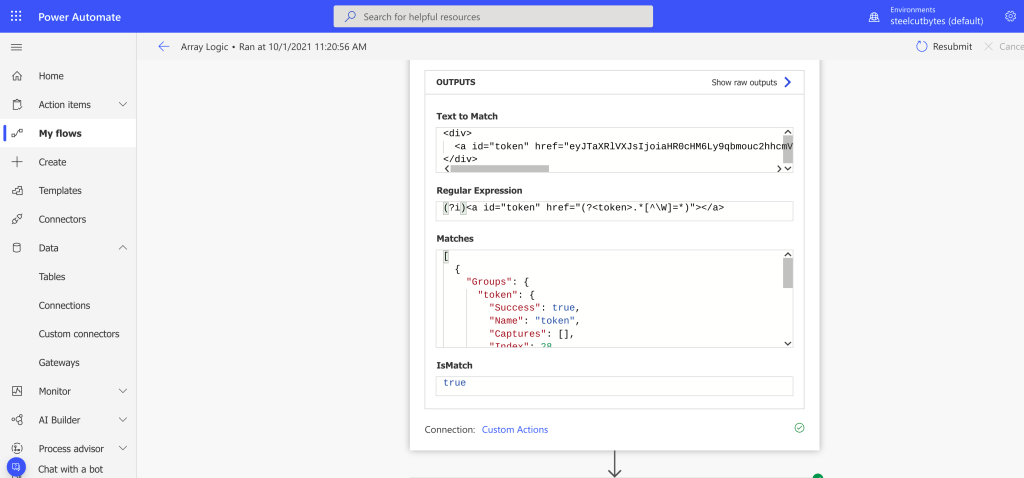
2) Next, we grab the BinarySecurityToken from the response of the HTTP action above, sending it as the Authorization header in our 2nd HTTP action. This action uses the https://yourtenant.sharepoint.com/_vti_bin/idcrl.svc endpoint.

If the site you are accessing is a subsite or a different site collection you’ll need to use that URL instead, i.e. https://yourtenant.sharepoint.com/sites/myothersitecoll/_vti_bin/idcrl.svc .

The header (with BinarySecurityToken) is set using the JSON + expression below:

{ 
  "Authorization": "BPOSIDCRL @{json(xml(body('Get_Login_Token')))?['S:Envelope']['S:Body']['wst:RequestSecurityTokenResponse']['wst:RequestedSecurityToken']['wsse:BinarySecurityToken']['#text']}" 
}

Here’s what that the HTTP action will look like:

You will receive the SPOIDCRL cookie from this 2nd HTTP action.

And now … from the output of this 2nd HTTP request, we’ll receive the SPOIDCRL cookie.

This is the required cookie we need to call our SOAP web service. Alright!

Finally, we’re getting somewhere!

Now that we’ve tackled our authentication issue, the last step is to query our calendar via the SOAP web service call to /lists.asmx.

So we’ll use a 3rd HTTP action to do the query, like so:

3rd and final HTTP action, calling the SOAP web service

We start by using the following SOAP endpoint and supplied headers: https://yourtenant.sharepoint.com/_vti_bin/lists.asmx

{
  "Content-Type": "text/xml; charset=utf-8",
  "SOAPAction": "\"http://schemas.microsoft.com/sharepoint/soap/GetListItems\""
}

If the site you are accessing is a subsite or a different site collection you’ll need to use that URL instead, i.e. https://yourtenant.sharepoint.com/sites/myothersitecoll/_vti_bin/lists.asmx .

Next, the body of the HTTP action is the SOAP Envelope below. It contains the input parameters of the GetListItems method. (I am only listing the parameters that I use, please see the link for all parameters.)

listName – The list’s id (GUID) or its title.

query – The SharePoint CAML query used to determine which list items to return.

viewFields – Specifies which fields of the list item SHOULD be returned.

queryOptions – Specifies various options for modifying the query.

The SOAP envelope containing our CAML query will look something like this:

<?xml version="1.0" encoding="utf-8"?>
<soap:Envelope xmlns:xsi="http://www.w3.org/2001/XMLSchema-instance" xmlns:soap="http://schemas.xmlsoap.org/soap/envelope/" xmlns:m="http://schemas.microsoft.com/sharepoint/soap/">
  <soap:Header/>
  <soap:Body>
    <m:GetListItems>
      <m:listName>Your Calendar List Id or Title</m:listName>
      <m:viewName/>
      <m:query>
        <Query>
          <Where>
            <And>
              <DateRangesOverlap>
                <FieldRef Name="EventDate" />
                <FieldRef Name="EndDate" />
                <FieldRef Name="RecurrenceID" />
                <Value Type="DateTime"><Now /></Value>
              </DateRangesOverlap>
              <Or>
                <Eq>
                  <FieldRef Name="ID" />
                  <Value Type="Integer">ItemId</Value>
                </Eq>
                <Eq>
                  <FieldRef Name="MasterSeriesItemID" />
                  <Value Type="Integer">ItemId</Value>
                </Eq>
              </Or>
            </And>
          </Where>
          <OrderBy>
            <FieldRef Name="EventDate" />
          </OrderBy>
        </Query>
      </m:query>
      <m:viewFields>
        <ViewFields>
          <FieldRef Name="EventDate" />
          <FieldRef Name="EndDate" />
          <FieldRef Name="fRecurrence" />
          <FieldRef Name="RecurrenceData" />
          <FieldRef Name="fAllDayEvent" />
          <FieldRef Name="MasterSeriesItemID" />
          <FieldRef Name="GUID" />
        </ViewFields>
      </m:viewFields>
      <m:rowLimit></m:rowLimit>
      <m:queryOptions>
        <QueryOptions>
          <CalendarDate>Specific Date</CalendarDate>
          <ExpandRecurrence>TRUE</ExpandRecurrence>
          <RecurrencePatternXMLVersion>v3</RecurrencePatternXMLVersion>
        </QueryOptions>
      </m:queryOptions>
      <m:webID/>
    </m:GetListItems>
  </soap:Body>
</soap:Envelope>

CAML Query, Let’s Break It Down

Here’s a great article that explains the results of several recurring date query tests.

<DateRangesOverlap /> – Compare the dates in a recurring event with a specified DateTime value to determine whether they overlap.

  • <Now /> – Use to retrieve all instances of a recurring event that overlap the current date right now. This generally gives you all recurring events from now into the future, based upon the recurrence pattern (Daily, Weekly, Monthly, Yearly).
  • <Month /> – Used to retrieve all instances of a recurring event that occur within a month. I’ve found this is most useful when the recurrence pattern is Monthly or Yearly.

<FieldRef Name="MasterSeriesItemID" /> – If you want to pull the recurring dates for a specific recurring event, pass its list item ID as the value here.

<QueryOptions /> – These options contain the magic for expanding the recurring events:

<ExpandRecurrence>TRUE</ExpandRecurrence>
<RecurrencePatternXMLVersion>v3</RecurrencePatternXMLVersion>

The optional queryoption <CalendarDate/> allows us to pass a specific date to be used as the starting date of our query (although it seems to be ignored when using <Now/>):

<CalendarDate>2021-01-01</CalendarDate>

Lastly, two important notes about how many dates SharePoint will return:

  1. No more than 30 expanded recurring dates are returned
  2. Max returned dates are no more than two years in the future.

Now, put it all together

Armed with these pieces, here’s my example query:

<?xml version="1.0" encoding="utf-8"?>
<soap:Envelope xmlns:xsi="http://www.w3.org/2001/XMLSchema-instance" xmlns:soap="http://schemas.xmlsoap.org/soap/envelope/" xmlns:m="http://schemas.microsoft.com/sharepoint/soap/">
  <soap:Header/>
  <soap:Body>
    <m:GetListItems>
      <m:listName>Compliance Calendar</m:listName>
      <m:viewName/>
      <m:query>
        <Query>
          <Where>
            <And>
              <DateRangesOverlap>
                <FieldRef Name="EventDate" />
                <FieldRef Name="EndDate" />
                <FieldRef Name="RecurrenceID" />
                <Value Type="DateTime"><Now /></Value>
              </DateRangesOverlap>
              <Or>
                <Eq>
                  <FieldRef Name="ID" />
                  <Value Type="Integer">155</Value>
                </Eq>
                <Eq>
                  <FieldRef Name="MasterSeriesItemID" />
                  <Value Type="Integer">155</Value>
                </Eq>
              </Or>
            </And>
          </Where>
          <OrderBy>
            <FieldRef Name="EventDate" />
          </OrderBy>
        </Query>
      </m:query>
      <m:viewFields>
        <ViewFields>
          <FieldRef Name="EventDate" />
          <FieldRef Name="EndDate" />
          <FieldRef Name="fRecurrence" />
          <FieldRef Name="RecurrenceData" />
          <FieldRef Name="fAllDayEvent" />
          <FieldRef Name="MasterSeriesItemID" />
          <FieldRef Name="GUID" />
        </ViewFields>
      </m:viewFields>
      <m:rowLimit></m:rowLimit>
      <m:queryOptions>
        <QueryOptions>
          <CalendarDate></CalendarDate>
          <ExpandRecurrence>TRUE</ExpandRecurrence>
          <RecurrencePatternXMLVersion>v3</RecurrencePatternXMLVersion>
        </QueryOptions>
      </m:queryOptions>
      <m:webID/>
    </m:GetListItems>
  </soap:Body>
</soap:Envelope>

Here’s the output of the query:

<?xml version="1.0" encoding="utf-8"?>
<soap:Envelope xmlns:soap="http://schemas.xmlsoap.org/soap/envelope/"
    xmlns:xsi="http://www.w3.org/2001/XMLSchema-instance"
    xmlns:xsd="http://www.w3.org/2001/XMLSchema">
    <soap:Body>
        <GetListItemsResponse xmlns="http://schemas.microsoft.com/sharepoint/soap/">
            <GetListItemsResult>
                <listitems xmlns:s='uuid:BDC6E3F0-6DA3-11d1-A2A3-00AA00C14882'
                    xmlns:dt='uuid:C2F41010-65B3-11d1-A29F-00AA00C14882'
                    xmlns:rs='urn:schemas-microsoft-com:rowset'
                    xmlns:z='#RowsetSchema'>
                    <rs:data ItemCount="2" ListItemCollectionPositionNext="Paged=Next&amp;p_StartTimeUTC=20221231T000001Z">
                        <z:row ows_EventDate='2021-12-31 00:00:00' ows_EndDate='2021-12-31 23:59:00' ows_fRecurrence='1' ows_fAllDayEvent='1' ows_GUID='{971C4640-015A-4E3E-91A3-7FD975606E92}' ows__ModerationStatus='0' ows__Level='1' ows_Title='Ensure Training conducted' ows_ID='155.0.2021-12-31T00:00:00Z' ows_UniqueId='155;#{4049F043-9F62-451E-ABC5-62E0550481A6}' ows_owshiddenversion='130' ows_FSObjType='155;#0' ows_Created='2016-11-30 19:48:04' ows_PermMask='0x7fffffffffffffff' ows_Modified='2021-11-04 12:12:03' ows_ScopeId='155;#{357BCCAA-6671-48A6-92F0-FC3C20EF2975}' ows_FileRef='155;#Lists/ComplianceCalendar/155_.000' ows_ComplianceRecurrence='1 - Daily, Weekly, Monthly, or Yearly' ows_MetaInfo='155;#' />
                        <z:row ows_EventDate='2022-12-31 00:00:00' ows_EndDate='2022-12-31 23:59:00' ows_fRecurrence='1' ows_fAllDayEvent='1' ows_GUID='{971C4640-015A-4E3E-91A3-7FD975606E92}' ows__ModerationStatus='0' ows__Level='1' ows_Title='Ensure Training conducted' ows_ID='155.0.2022-12-31T00:00:00Z' ows_UniqueId='155;#{4049F043-9F62-451E-ABC5-62E0550481A6}' ows_owshiddenversion='130' ows_FSObjType='155;#0' ows_Created='2016-11-30 19:48:04' ows_PermMask='0x7fffffffffffffff' ows_Modified='2021-11-04 12:12:03' ows_ScopeId='155;#{357BCCAA-6671-48A6-92F0-FC3C20EF2975}' ows_FileRef='155;#Lists/ComplianceCalendar/155_.000' ows_ComplianceRecurrence='1 - Daily, Weekly, Monthly, or Yearly' ows_MetaInfo='155;#' />
                    </rs:data>
                </listitems>
            </GetListItemsResult>
        </GetListItemsResponse>
    </soap:Body>
</soap:Envelope>

Pretty cool.

Hopefully, you’ll be able to tame those pesky recurring events as I have and maybe even grow to appreciate them too.

Happy coding!


Follow My Blog

Get new content delivered directly to your inbox.

Get Some REST … Dr’s Orders

Ok, so I’m not a doctor, but this is good advice regardless.

In this case, the “rest” I’m talking about is leveraging the SharePoint REST API. It’s pretty powerful and can allow you to do things in Power Automate (or any other tool) which you may not have any prebuilt actions for, such as moving a list item into a folder or modifying the list item permissions.

Or it can make a task simpler, such as replacing the out-of-the-box Update List Item action. This will be our focus today.

Update List Item

If you’ve used the Update List Item action within Power Automate, you can immediately see some of the benefits of this action.

SharePoint Action – Update List Item

It provides a rich UI for updating your list items.

You get red asterisks for required fields, dropdown values for choice fields, leaving fields blank keeps their current values*, etc.

Nice!

*Unfortunately, I’ve found that this is not always the case, as field values are sometimes cleared when left blank. I’ve had some coworkers attest to this as well.

But things can get not so nice real quick … just try using it to update a list item with more than 5 fields!

Uh-oh.

I’ve got a lot of work ahead of me 😲

Plus, what if I only need to update 2 or 3 of those fields?

Oh boy.

This form starts to make me feel a little anxious, like I’m filling out medical forms or applying for a mortgage.

Not really, but the experience could be better. Here’s where knowing (or learning) some of the SharePoint REST API endpoints can come in handy.

And REST, 2, 3, 4 …

One of the nifty SharePoint REST API endpoints is ValidateUpdateListItem.

This endpoint allows you to update a specific list item, passing only the field(s) and their value(s) that you want to update. It hangs off the list item object itself, so the API path looks like this:

_api/web/getList('/domain/relative/url/to/list/')/items(ItemId)/ValidateUpdateListItem

Pro Tip: Most code examples tend to get the list either by using _api/web/lists/getByTitle(...)/ or _api/web/lists(guid'...')/. Your code can break if the list title is changed or the GUID is different (dev site vs. production). I prefer the _api/web/getList(...)/ method to get my list. This takes the relative URL of the list which can’t be easily changed and tends to be the same in dev and production, so your code won’t break.

So our previously complex update list item becomes:

Send an HTTP Request to SharePoint

As you can see, the explicit fields/values in the HTTP body removes the ambiguity we had before.

We know which fields are being updated and what their values will be. Win!

{
  "formValues": [
    { "FieldValue": "InternalField1Name", "FieldValue": "Value1AsString" },
    { "FieldValue": "InternalField2Name", "FieldValue": "Value2AsString" }
  ],
  "bNewDocumentUpdate": false|true,
  "checkInComment": ""
}

Notice how the headers are using application/json;odata=nometadata . This is key to the simplicity of the overall HTTP body structure (above) and the field values (below).

  • Only supply the fields and values you want to update. If you don’t include it, it won’t be updated. Simple as that.
  • To clear a field value (depending on its type below) explicitly use null, -1, or "". Now you know what the value will be.
  • For complex fields (choice, lookup, user or group, managed metadata, etc.) those values are now a lot simpler to provide when using this method.

Here’s a good reference on the field values, provided by Andrew Koltyakov, with some examples:

// Text field (single line and note)
{ "FieldName": "InternalTextFieldName", "FieldValue": "123" },

// Number field (passed as string)
{ "FieldName": "NumberField', "FieldValue": "123"  },

// Yes/No field (Yes = "1" or "True", No = "2" or "False")
{ "FieldName": "InternalYesNoFieldName", "FieldValue": "1" },
{ "FieldName": "InternalYesNoFieldName", "FieldValue": "True" },

// Person or group, single and multiple (array of 1 or more users, represented as a string)
{ "FieldName": "InternalPersonFieldName", "FieldValue": "[{'Key':'i:0#.f|membership|username@dom.ain'}]" },
{ "FieldName": "InternalPersonFieldName", "FieldValue": "[{'Key':'i:0#.f|membership|username1@dom.ain'},{'Key':'i:0#.f|membership|username2@dom.ain'}]" },

// Dates should be in in the following formats
{ "FieldName": "InternalDateTimeFieldName", "FieldValue": "01/01/2021 12:00 PM" },
{ "FieldName": "InternalDateFieldName", "FieldValue": "01/01/2021" },

// Choice field (single and multi-valued)
{ "FieldName": "InternalChoiceFieldName", "FieldValue": "Choice 1" },
{ "FieldName": "InternalMultiChoiceFieldName", "FieldValue": "Choice 1;#Choice 2" },

// Hyperlink or picture (URL, description)
{ "FieldName": "InternalHyperlinkFieldName", "FieldValue": "https://steelcutbytes.com, Steelcut Bytes" },

// Lookups fields (single and multi-valued)
{ "FieldName": "InternalLookupFieldName", "FieldValue": "2" },
{ "FieldName": "InternalMutliLookupFieldName", "FieldValue": "3;#4;#5" },

// Mamnaged metadata fields (single and multi-valued)
{ "FieldName": "InternalSingleMMDFieldName", "FieldValue": "Power Automate|220a3627-4cd3-453d-ac54-34e71483bb8a;" },
{ "FieldName": "InternalMultiMMDFieldName", "FieldValue": "Power Automate|220a3627-4cd3-453d-ac54-34e71483bb8a;Power Apps|700a1bc3-3ef6-41ba-8a10-d3054f58db4b;" }

But wait … there’s more!

This endpoint has one last trick up its sleeve, making it even more useful and powerful.

It can act like the server side SystemUpdate method.

This allows you to:

  • Create a new item version or overwrite the existing item version "bNewDocumentUpdate": false|true,
  • Overwrite the Created, Created By (author), Modified, and Modified By (editor) audit fields {"FieldName":"Editor", "FieldValue": "[{'Key':'i:0#.f|membership|not.me@dom.ain'}]"}
  • And if the item is checked-out, you can specify check-in comments. "checkInComment": "Checking this in."

Pretty slick.

Happy coding!


Follow My Blog

Get new content delivered directly to your inbox.

Sort Array in Power Automate, Using Custom Code Connector

As I play around with leveraging code in custom connectors more and more, I just love the possibilities it offers.

One of the original posts I saw was from Alex Shlega where he gives an example sorting an array. Wow this is great! But what if my array is not an array of just string values? What if it has numbers, or complex values, or nulls, etc.?

So I extended his example a bit using custom sorting logic, and added the ability to choose your desired sort order.

Sort Array w/Custom Code Connector

Let’s see how that works.

(Please see my other posts where I discuss a few more details on using the custom connector UI and where to apply the YAML and C# script code when building the Regular Expression custom action and add some enhancements.)

Action Definition

Here’s what our custom action can do:

swagger: '2.0'
info: {title: SteelCut Bytes Actions, description: SteelCut Bytes Power Automate Actions,
  version: '1.0'}
host: flow.steelcutbytes.com
basePath: /
schemes: [https]
consumes: []
produces: []
paths:
  /SortArray:
    post:
      responses:
        default:
          description: default
          schema:
            type: array
            items: {}
            description: Sorted array
            title: Sorted Array
      summary: Sort array
      operationId: SortArray
      description: Sorts the array values using both String and Numeric comparison.
      parameters:
      - name: value
        in: body
        required: true
        schema:
          type: object
          properties:
            items:
              type: array
              items: {}
              description: Unsorted chaotic array of values
              title: Chaotic Array
            sort:
              title: Sort Order
              type: string
              enum: [Ascending, Descending, Reverse]
              default: Ascending
          required: [items, sort]
definitions: {}
parameters: {}
responses: {}
securityDefinitions: {}
security: []
tags: []

Normally, you want to be as specific as possible in the types used in the YAML definition. But, since we are allowing an array of multiple data types (string, numbers, null, objects, etc.) it pays to be vague in this case.

Secret sauce:

Declaring both our input and output array items without a type (items: {}) allows both our action and code to receive our array of varying data types.

Code

Here’s the C# code for the sorting logic:

public class Script : ScriptBase
{
    public override async Task<HttpResponseMessage> ExecuteAsync()
    {
        switch (this.Context.OperationId)
        {
            case "SortArray":
                return await this.HandleSortArray().ConfigureAwait(false);
        }

        var response = new HttpResponseMessage(HttpStatusCode.BadRequest);
        response.Content = CreateJsonContent($"Unknown operation ID '{this.Context.OperationId}'");
        return response;
    }

    private async Task<HttpResponseMessage> HandleSortArray()
    {
        var contentAsString = await this.Context.Request.Content.ReadAsStringAsync().ConfigureAwait(false);
        var contentAsJson = JObject.Parse(contentAsString);

        var stringJArray = (JArray)contentAsJson["items"];
        var sortOrder = (string)contentAsJson["sort"];

        var objectList = stringJArray.ToObject<List<Object>>();

        switch (sortOrder)
        {
            case "Ascending":
            case "Descending":
                objectList.Sort((x, y) =>
                {
                    var strX = (x == null ? null : x.ToString());
                    var strY = (y == null ? null : y.ToString());

                    decimal decX, decY;
                    if (decimal.TryParse(strX, out decX) && decimal.TryParse(strY, out decY))
                        return (decX > decY) ? 1 : (decX < decY) ? -1 : 0;
                    else
                        return StringComparer.Ordinal.Compare(strX, strY);
                });
                break;
        }

        if (sortOrder != "Ascending")
            objectList.Reverse();

        var result = JArray.FromObject(objectList);

        var response = new HttpResponseMessage(HttpStatusCode.OK);
        response.Content = CreateJsonContent(result.ToString());
        return response;
    }
}

The updates I’ve made to Alex Shlega’s example are highlighted in the code above. I’ll quickly explain those.

The first thing I do is make sure the JSON is converted to an array of objects and not strings.

var objectList = stringJArray.ToObject<List<Object>>();

This ensures that the types of numbers and other non-string data are preserved so that the sorting logic will distinguish them correctly. This comes in handy when sorting numbers in logical numeric order instead of string order, i.e. 0, 1, 2, 10 instead of "0", "1", "10", "2", and when handling null values.

Next I handle the sort logic, using the .NET Enumerable.Sort(...) extension method.

objectList.Sort((x, y) =>
{
  var strX = (x == null ? null : x.ToString());
  var strY = (y == null ? null : y.ToString());

  decimal decX, decY;
  if (decimal.TryParse(strX, out decX) && decimal.TryParse(strY, out decY))
    return (decX > decY) ? 1 : (decX < decY) ? -1 : 0;
  else
    return StringComparer.Ordinal.Compare(strX, strY);
});

To handle both integer and float number types, I check if the values are decimal using TryParse(...), and when true, I sort according to numeric logic.

If not numeric, then I treat all other types as a string (or null) and sort according to string sorting logic using StringComparer.Ordinal.Compare(...).

Here’s the output of the enhanced sort logic:

Unsorted input array -> Sorted output array

Simple as that!

But … it can be better!

This is definitely just a quick and easy sort. My main focus was on handling numbers correctly, empty strings, and null values.

When showing this to one of my brilliant co-workers (Reza Dorrani, thank you!) he suggested an enhancement to handle more complex data type scenarios, such as sorting objects by a specific property value.

This is on my to-do and will be the source of a future post.

Happy coding!


Follow My Blog

Get new content delivered directly to your inbox.

Not-So-Regular Expression Support in Power Automate, via Custom Code Connector (Part Deaux)

One thing you may have noticed in some of the Power Automate actions is the ability to select a predefined value from a list of choices when setting the value of an action’s parameter. (Think of any one of the SharePoint actions allowing you to choose a site URL and a list name, the Terminate action with the Status parameter Failed, Cancelled, Succeeded, or the Regex Options parameter in the Regular Expression custom code connector we built in the previous post, etc.)

Terminate Action with List of Status Choices

This comes in really handy when you want to prevent the user from incorrectly configuring an action or guide them to a specific action input.

I’ve updated the Regular Expression custom code connector action to provide the user a new IsNumeric choice for the Regular Expression parameter.

This image has an empty alt attribute; its file name is image-5-1.png
Regular Expression Custom Code Connector with a Choice List

The purpose of this new parameter choice is to perform a match against the supplied text and evaluate whether or not it is strictly a numeric value. For example: 1234567 is numeric, whereas THX1138 is not.

Let’s see how we can enhance our custom action.

Action Definition

As we saw previously, what your custom action can do is defined by the YAML swagger file.

This definition is the same as the previous post except for one new attribute: enum. This attribute requires an array of one or more literal values (enumerations), in our example [IsNumeric] .

swagger: '2.0'
info: {title: SteelCut Bytes Actions, description: SteelCut Bytes Power Automate Actions,
  version: '1.0'}
host: flow.steelcutbytes.com
basePath: /
schemes: [https]
consumes: []
produces: []
paths:
  /RegularExpression:
    post:
      responses:
        default:
          description: default
          schema:
            type: object
            properties:
              input: {type: string, description: The supplied string to search for
                  a match., title: Text to Match}
              pattern: {type: string, description: The supplied .NET regular expression
                  pattern to match., title: Regular Expression}
              matches:
                type: array
                items:
                  type: object
                  properties:
                    Groups: {type: object}
                    Success: {type: boolean}
                    Name: {type: string}
                    Captures:
                      type: array
                      items: {type: object}
                    Index: {type: integer}
                    Length: {type: integer}
                    Value: {type: string}
                description: An array of the Match objects found by the search. If
                  no matches are found, the method returns an empty array.
                title: Matches
              isMatch: {type: boolean, description: Indicates whether the .NET regular
                  expression finds a match in the input string., title: IsMatch}
      summary: Regular Expression
      description: Searches the specified input string for all occurrences of a specified
        .NET regular expression, using the specified matching options.
      operationId: RegularExpression
      parameters:
      - name: value
        in: body
        required: true
        schema:
          type: object
          properties:
            input: {type: string, description: The string to search for a match, title: Text
                to Match}
            pattern:
              type: string
              description: The .NET regular expression pattern to match
              enum: [IsNumeric]
              title: Regular Expression
            options:
              title: Regex Options
              description: Value that specifies options for matching
              type: string
              enum: [None, IgnoreCase, Singleline, Multiline]
              default: IgnoreCase
          required: [options, pattern, input]
definitions: {}
parameters: {}
responses: {}
securityDefinitions: {}
security: []
tags: []

When an enumeration is chosen, the value of that parameter will be a literal string equal to that enumeration. So in our example, the Regular Expression parameter will now be equal to the literal string IsNumeric when selected.

The new enumeration value needs to be evaluated and handled by our custom code.

Code

To use this new value in our code, we simply need to check for that value and then do something with it or because of it.

  • If the value matches IsNumeric then use a hard-coded regular expression (regex pattern ^\d+$) instead.
  • If the value is not IsNumeric then we treat it as an actual regular expression and use it as we did before.
public class Script : ScriptBase
{
    public override async Task<HttpResponseMessage> ExecuteAsync()
    {
        switch (this.Context.OperationId)
        {
            case "RegularExpression":
                return await this.HandleRegexOperation().ConfigureAwait(false);
        }

        var response = new HttpResponseMessage(HttpStatusCode.BadRequest);
        response.Content = CreateJsonContent($"Unknown operation ID '{this.Context.OperationId}'");
        return response;
    }

    private async Task<HttpResponseMessage> HandleRegexOperation()
    {
        var contentAsString = await this.Context.Request.Content.ReadAsStringAsync().ConfigureAwait(false);
        var contentAsJson = JObject.Parse(contentAsString);

        var textToMatch = (string)contentAsJson["input"];
        var regexInput = (string)contentAsJson["pattern"];
        var regexOptions = (string)contentAsJson["options"];

        var regex = new Regex(
            (regexInput == "IsNumeric") ? @"^\d+$" :
            (regexInput),

            (regexOptions == "IgnoreCase") ? (RegexOptions.IgnoreCase | RegexOptions.Compiled) :
            (regexOptions == "Singleline") ? (RegexOptions.Singleline | RegexOptions.Compiled) :
            (regexOptions == "Multiline") ? (RegexOptions.Multiline | RegexOptions.Compiled) :
            (RegexOptions.None | RegexOptions.Compiled),

            TimeSpan.FromSeconds(1)
        );

        var jSerializer = JsonSerializer.Create(new JsonSerializerSettings
        {
            ReferenceLoopHandling = ReferenceLoopHandling.Ignore,
        });

        var result = new JObject
        {
            ["input"] = textToMatch,
            ["pattern"] = regex.ToString(),
            ["isMatch"] = regex.IsMatch(textToMatch),
            ["matches"] = JArray.FromObject(regex.Matches(textToMatch), jSerializer),
        };

        var response = new HttpResponseMessage(HttpStatusCode.OK);
        response.Content = CreateJsonContent(result.ToString());
        return response;
    }
}

As you can see, this adds tremendous value to the end user by providing them a simpler configuration of the action and amplifies the intent of its use. In this case, these choices could reduce or even eliminate the need for them to know regular expression syntax.

What about my custom value? Why not both.

One of the nice things about the Power Automate GUI is that you can also supply a custom enumeration as a choice. You do this by simply choosing the Enter custom value choice at the bottom of the choice list. This turns the choice list field back into a text box.

Custom Regular Expression Using Dynamic Panel

So now, you can apply a custom Regular Expression pattern (as we did in the original version) like this:

  1. Simply choose the Enter custom value choice to display the Regular Expression text box,
  2. Enter your regular expression pattern in the Expression editor of the flow’s Dynamic content panel, by wrapping it in the string(...) expression.

For example:

@string('(?i)<a id="token" href="(?<token>.*[^\W]=*)"></a>')

Here’s the result:

Custom Regular Expression Usage and Output

Wow, wow, wow.

But wait … there’s more!

You can use this approach to provide whatever built-in regular expressions or checks you’d like. The possibilities are endless.

Here are some example expressions:

Have fun.


Follow My Blog

Get new content delivered directly to your inbox.

Regular Expression Support in Power Automate, via Custom Code Connector

When playing around with a new custom connection I was creating in Power Automate, I came across the Code (Preview) tab. The developer part of my brain thought “Oh, that’s neat, I can now include code, I like writing code. But I’m not sure why I would need or use that.” And that was that.

That was, until, I came across this Twitter post by John Liu. In it he mentions two other custom code connector solutions by Alex Shlega and Hiro which sparked him to create a parse CSV connector. I recommend checking out those other two as well. One thing I always appreciate about John (hopefully he’s ok with my referring to him as if we know each other) is that his posts and ideas always spark those “ooh, I wonder if …” thoughts which my brain latches onto.

This is when it clicked.

Code in custom connectors can be used 1) for simplifying complex Power Automate flow logic by (in some cases) replacing the need for multiple actions, and 2) to fill in missing Power Automate functionality. So this got me thinking, what expressions/actions are missing that I am need of? After one last pass through the Microsoft documentation and examples, their regular expression example grabbed my attention. Ooh yeah, I’ve needed that, let’s built that!

Building the Regular Expression action using a custom code connector.

Here’s a look at what we’re ultimately going to build. This action will allow us to supply the text to match, a regular expression pattern, some basic options, and receive the matches.

And here’s what we need to do it. The two main components of custom code connectors are: the action definition (what it can do) and the code (how it will do it).

Action Definition

The action can be defined using the custom connector GUI wizard or using the YAML swagger definition editor. If this is your first time building a connector, while a little intimidating, I would recommend that you use the GUI so that you become familiar with all of the components of the action definition.

Custom Connector GUI wizard

But for simplicty of this post, I’ve included the swagger definition below. Simply use the “Swagger Editor” toggle to display the YAML editor and paste in the swagger definition.

To switch back to the wizard under the Defintion tab, use the “Swagger Editor” toggle again.

swagger: '2.0'
info: {title: SteelCut Bytes Actions, description: SteelCut Bytes Power Automate Actions,
  version: '1.0'}
host: flow.steelcutbytes.com
basePath: /
schemes: [https]
consumes: []
produces: []
paths:
  /RegularExpression:
    post:
      responses:
        default:
          description: default
          schema:
            type: object
            properties:
              input: {type: string, description: The supplied string to search for
                  a match., title: Text to Match}
              pattern: {type: string, description: The supplied .NET regular expression
                  pattern to match., title: Regular Expression}
              matches:
                type: array
                items:
                  type: object
                  properties:
                    Groups: {type: object}
                    Success: {type: boolean}
                    Name: {type: string}
                    Captures:
                      type: array
                      items: {type: object}
                    Index: {type: integer}
                    Length: {type: integer}
                    Value: {type: string}
                description: An array of the Match objects found by the search. If
                  no matches are found, the method returns an empty array.
                title: Matches
              isMatch: {type: boolean, description: Indicates whether the .NET regular
                  expression finds a match in the input string., title: IsMatch}
      summary: Regular Expression
      description: Searches the specified input string for all occurrences of a specified
        .NET regular expression, using the specified matching options.
      operationId: RegularExpression
      parameters:
      - name: value
        in: body
        required: true
        schema:
          type: object
          properties:
            input: {type: string, description: The string to search for a match, title: Text
                to Match}
            pattern:
              type: string
              description: The .NET regular expression pattern to match
              title: Regular Expression
            options:
              title: Regex Options
              description: Value that specifies options for matching
              type: string
              enum: [None, IgnoreCase, Singleline, Multiline]
              default: IgnoreCase
          required: [options, pattern, input]
definitions: {}
parameters: {}
responses: {}
securityDefinitions: {}
security: []
tags: []

Code

The code creates a .NET Regular Expression, matching the text against the pattern, returning the matches.

Simply paste the code below under the Code (Preview) tab in the connector GUI.

public class Script : ScriptBase
{
    public override async Task<HttpResponseMessage> ExecuteAsync()
    {
        switch (this.Context.OperationId)
        {
            case "RegularExpression":
                return await this.HandleRegexOperation().ConfigureAwait(false);
        }

        var response = new HttpResponseMessage(HttpStatusCode.BadRequest);
        response.Content = CreateJsonContent($"Unknown operation ID '{this.Context.OperationId}'");
        return response;
    }

    private async Task<HttpResponseMessage> HandleRegexOperation()
    {
        var contentAsString = await this.Context.Request.Content.ReadAsStringAsync().ConfigureAwait(false);
        var contentAsJson = JObject.Parse(contentAsString);

        var textToMatch = (string)contentAsJson["input"];
        var regexInput = (string)contentAsJson["pattern"];
        var regexOptions = (string)contentAsJson["options"];

        var regex = new Regex(regexInput,
            (regexOptions == "IgnoreCase") ? (RegexOptions.IgnoreCase | RegexOptions.Compiled) :
            (regexOptions == "Singleline") ? (RegexOptions.Singleline | RegexOptions.Compiled) :
            (regexOptions == "Multiline") ? (RegexOptions.Multiline | RegexOptions.Compiled) :
            (RegexOptions.None | RegexOptions.Compiled),

            TimeSpan.FromSeconds(1)
        );

        var jSerializer = JsonSerializer.Create(new JsonSerializerSettings
        {
            ReferenceLoopHandling = ReferenceLoopHandling.Ignore,
        });

        var result = new JObject
        {
            ["input"] = textToMatch,
            ["pattern"] = regex.ToString(),
            ["isMatch"] = regex.IsMatch(textToMatch),
            ["matches"] = JArray.FromObject(regex.Matches(textToMatch), jSerializer),
        };

        var response = new HttpResponseMessage(HttpStatusCode.OK);
        response.Content = CreateJsonContent(result.ToString());
        return response;
    }
}

Caveats: code must be C#, finish in 5 secs or less*, and be no larger than 1MB.

*In my tests, I’ve found that if the code takes longer than 5 seconds to run, the action and flow will still run. But for best performance, you should still stick to this requirement by keeping your code as lean and optimized as possible. I’m not sure, but I feel like at some point Microsoft could prevent your action and flow from running successfully if it violates this time threshold. Just keep this in mind.

Output

Here’s the output of the Regular Expression custom code connection action.

Regular Expression Action Output

As you can see from the output, it returns the array of Matches, along with the IsMatch true/false value. This allows the Matches output to be used in an expression like this:

@first(outputs('Regular_Expression')?['body/matches'])?['Groups/token/Value']

Now you can use Regular Expressions in your flows. How about that!

Currently, there are no official out-of-the-box actions or expressions in Power Automate that provide support for regular expressions, although it’s been requested. And recently, I found out that you can also do this via Excel Office scripts, but I’ve never been truly comfortable with Excel, a side effect of having to write VBA code early on in my career. (I know, I know, the Office Script code is actually Javascript which is better, but still …)

What other creative ways can we leverage custom code connectors? I’ll leave that as an exercise for the reader … and future blog posts.

Happy coding!


Follow My Blog

Get new content delivered directly to your inbox.